Thursday, May 23, 2013

Five tips for improving Mac performance

I get many questions about improving Macs since we are hanging on to our computers longer. So when I read Erik Ecke's Five Tips blog, May 22, 2013, I decided to post it.

Takeaway: These aren’t the cheapest or the easiest ways, but these tips for improving your Mac’s performance will have the most impact.


Conduct a Google search for improving Mac performance and you’ll find all kinds of recommendations, some of which actually work. Spend all the time you want removing language packs, cleaning a Mac’s chassis and removing icons from the Mac Dock (all actions I’ve seen other Internet sites recommend), but if you really want to speed up a slow Mac, consider the following five steps. Note, these aren’t the “five easiest methods of speeding up a slow Mac” or even “the five cheapest methods of speeding up a slow Mac.” No, these are five proven methods for improving Mac performance.

#1 Upgrade to a solid state disk

SSDs are fast, certainly enough faster than a traditional drive that you or the end user will notice the performance boost. If you’re struggling to improve performance on a system, especially one running a 5400RPM drive or possessing a disk that’s failing, consider upgrading to an SSD. In addition to faster read and write operations, SSDs consume less energy, thereby extending mobile laptop users battery life.

Just be sure to check and ensure the Mac will accommodate the new disk and that you’re capable of performing the upgrade yourself. Newer Macs, especially iMacs and Mac laptops, are challenging to upgrade; there’s no shame subcontracting the job to an authorized Apple agent. Also be sure to confirm the SSD you select boasts sufficient storage. SSDs are more expensive than HDDs and tend to prove better in situations where large storage capacities are not required.

#2 Add more memory

Most Macs ship with less physical memory than the machines accommodate. Upgrading a Mac’s RAM helps OS X obtain more overhead for processing operating system and application tasks, processes and operations, typically drastically improving performance. With RAM chips proving cost-effective (compared to purchasing a new, more capable machine), the upgrade can help cash-strapped organizations leverage another year or two from an otherwise capable system.

As with SSDs, you can’t just rush out and purchase RAM, however. Each Mac requires a specific type of memory running at a specific speed. Further, the machine’s current configuration dictates whether some old chips might be removed to make room for the planned upgrade. Be sure to review a model’s specifications and current configuration before placing new RAM orders.

#3 Eliminate automatic program loading

Over time, users install many applications that load automatically upon login. Or, users sometimes leave numerous applications open when they terminate their OS X sessions. Upon logging in, these applications automatically launch, which also automatically slows system performance.

Review applications that automatically load (check the Dock and close any applications whose icons possess the tell-tale underscore highlight) and confirm login items are minimized. Administrators and users can review automatic login items by opening System Preferences, choosing Users & Groups, highlighting the corresponding user account and selecting the Login items tab. Uncheck the box for any application that need not automatically start upon logging in.

#4 Minimize or eliminate widget use

Weather updates, sports scores, Twitter feeds, Facebook utilities, stock tickers and even dancing hula animations are cool and groovy. However, these widgets, whether the user is actively using them or not, suck system resources. Check a slow-performing Mac’s Dashboard (reached from Mission Control, a hot corner or the Dashboard application itself) for unneeded widgets. Remove any unnecessary Dashboard program, as each requires system resources even when the Dashboard isn’t active.

#5 Confirm sufficient free disk space

Exhaust available free disk space and a system slows. There’s no getting around it. Mac OS X, like Windows, requires free disk space for accommodating paging operations, storing files, adjusting email and database storage, and performing numerous other tasks. Review a system’s disk allocation to ensure sufficient free space exists. If insufficient space exists, either remove unnecessary files or upgrade to a larger disk.

How much free space is sufficient? There’s no magic formula. Most Macs should possess at least 10GB of free space, however, as doing so enables maybe 5GB of space for paging files and another 5GB for storing new documents, spreadsheets, presentations, photos, videos and other files. That said, if a system’s function is to edit video, the computer may require 20GB or more of free space, it just depends upon the model, user, applications in use, and tasks being performed


Wednesday, October 3, 2012

PowerPoint 2010:  Comparing and Merging Presentations

If you develop a presentation with a group, multiple versions of the same presentation may exist. PowerPoint now allows you to compare and merge different versions of a PowerPoint file.
  1. Open the presentation that you want to merge.

  2. Click the Review tab on the Ribbon and click the Compare button in the Compare group.
    The Choose File to Merge with Current Presentation dialog box appears.

  3. Navigate to the location of the file that you want to compare with the open presentation, select the file, and click Merge.

    PowerPoint displays the merged file in Review mode. The Revisions pane opens, listing all changes to the presentation.
    There are two sections on the Details tab in the Revisions pane:

    •  Slide changes: Lists all of the changes that were made to the current slide.
    •  Presentation changes: Lists all of the changes that were made to the presentation as a whole.

  4. Click a change on the Details tab in the Revisions pane.
    A text box appears detailing all of the changes to the object or text.

    Tip:  To preview what the slide would look like with all of the changes accepted, click the Slides tab on the Revisions pane.

  5. Do one of the following:
    • Accept a change: Click the check box of the change or changes that you want to make.
    • Reject a change: Do nothing; keep the check box unchecked.

    The slide adjusts to reflect the accepted changes.

    >> Other Ways to Accept Changes:
    Click on the change you want to accept, click the Review tab on the Ribbon, and click the Accept button in the Compare group.


    Comparing revisions to a presentation

  6. To move to the next change, click the Review tab on
    the Ribbon and click the Next button in the Compare
    group.

    A text box for the next change appears.
  7. Repeat steps 4 through 6 until you are finished
    reviewing all of the changes.

  8. When finished, click the Review tab on the Ribbon
    and click the End Review button in the Compare
    group.

    A dialog box appears warning you that any unapplied
    changes will be discarded.

  9. Click Yes.
    Review mode ends, and the Revisions pane
    disappears.

  10. Click the Save button on the Quick Access Toolbar to
    finalize the revisions.

    Tips
    • To accept all of the changes to the presentation at once, click the Review tab on the Ribbon, click the Accept button list arrow in the Control group, and select Accept All Changes to the Presentation from the list.

    • To reject all changes to the presentation at once, click
      the Review tab on the Ribbon, click the Reject
      button list arrow in the Control group, and select
      Reject All Changes to the Presentation from the
      list.

The Slides tab in the Revisions pane shows what the slide will look like if all changes are accepted.


Monday, March 5, 2012

Print a Single Envelope in Word


This blog is based on an article by Susan Harkins, a writer for TechRepublic.


Printing a single envelope in Word is simple, but getting everything just right requires a bit of knowledge because there are many options.


The first step is to check your printer for envelope placement. If you’re lucky, you have a special drawer for envelopes. Lacking a drawer, you’ll probably find placement instructions on the manual feed. Check carefully; you should find a small embossed indicator that specifies the feed position for envelopes. They’re all different, so be sure to check your printer. For example, this Lexmark Z32 feeds an envelope face up and the bottom flush with the right side of the feed tray.


Once you have an envelope correctly positioned, you’re ready to enter the return and delivery addresses as follows:
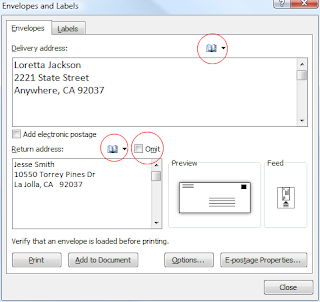
  1. In Word 2007 and 2010 click Mailings on the Ribbon, then click Envelopes in the Create group. Or you can select Envelopes when creating a New document.  These options are available in previous versions of Word, but the menus and dialogs are somewhat different.
  2. On the Envelopes tab, enter the delivery and return address. (The return address may already be present, but you can change it.)

At this point, you have a few options you can apply:
  • If Outlook is your default mail client, you can click the book icon to grab an existing address from Outlook to fill-in your delivery and/or return address.
  • Check the Omit option if you do not want to print the return address.
  • The Add Electronic Postage and E-Postage Property options are available, but work only if you have installed the appropriate software beforehand. We won’t cover those options today.
  • Be sure to check the preview regularly, to make sure your choices match your needs.


After entering your addresses, check the
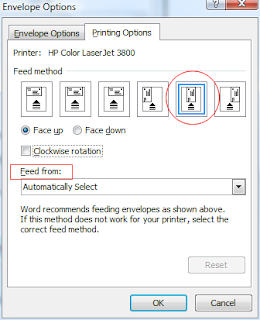
Feed option. This option confuses some users and you can’t depend on Word to configure things correctly. To get started, click the Feed option, select the Printing Options tab and set the following options, as required:
  • First, choose Face Up or Face Down, accordingly. If the envelope goes through the manual feeder print side up, choose Face Up.
  • If the Feed method options aren’t showing the print facing the right direction, click the Clockwise Rotation option.
  • Use the Feed From dropdown if you have a special envelop drawer or feed.


Once you’ve set the Feed options correctly, click OK to return to the first dialog box. Check the Feed option; the picture should update according to your choices.

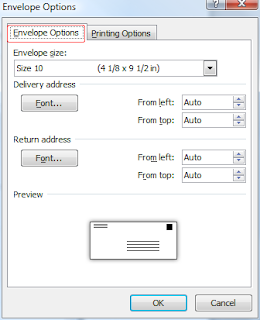
You might want to change the font and address positions on the envelope. To do so, click the Options button and select the Envelope Options tab.  You can change the envelope size by choosing an option from the Envelope Size dropdown. 

 Changing the font is easy; w
hile on the Envelope Options tab, click the appropriate Font button and change the options as you normally would. To reset the position of the return or delivery address use the From Left and From Top options and watch the preview envelope update accordingly. 


When you’re done, click OK to return to the original dialog.  At this point, you’re ready to print, click Print and you’re done!


Thursday, July 2, 2009

Tips for formatting data in Office Excel 2007 for Mail Merge

Today’s blog comes from Microsoft’s “Help and How-to RSS feed:

If your data file is an Office Excel worksheet that includes percentages, currency values, or postal codes, you can preserve the numeric formatting of the data by using Dynamic Data Exchange (DDE) to connect to the Excel worksheet from Word. For example, you can make sure a five-digit postal code of 07865 from your data file is not displayed as the number 7865 (without the leading zero).


Before you connect to the worksheet, do the following in Word:

  1. Click the Microsoft Office Button , and then click Word Options.

  2. Click Advanced.

  3. Scroll to the General section, and select the Confirm file format conversion on open check box.

  4. Click OK.

  5. With the mail merge main document open, in the Start Mail Merge group on the Mailings tab, click Select Recipients, and then click Use Existing List.

  6. Locate the Excel worksheet in the Select Data Source dialog box, and double-click it.

  7. In the Confirm Data Source dialog box, click MS Excel Worksheets via DDE (*.xls), and then click OK.

Note If you don't see MS Excel Worksheets via DDE (*.xls), select the Show all check box.

  1. In the Microsoft Office Excel dialog box, for Named or cell range, select the cell range or worksheet that contains the information that you want to merge, and then click OK.

Note To prevent being prompted every time you open a data file, you can clear the Confirm conversion at Open check box after you connect to the worksheet.

Tuesday, September 30, 2008

Recover Deleted Items in Outlook 2007

Did you know that you can recover deleted items in Microsoft Office Outlook 2007 even after you have emptied the Deleted Items folder. In past versions of Outlook, once the Deleted Items folder was emptied, those items were permanently deleted.

But now you can recover these deleted items if you have a Microsoft Exchange Server account. If you don't have an Exchange Server account here at Scripps Research, it's easy to get one. Just submit a service request to IT Services at http://www.scripps.edu/rc/hd/ or call the Help Desk x4-9369 and ask for one.

Our Exchange Server administrator specifies the retention time for items that are deleted permanently on the server running Exchange. Our retention time is 30 days. After this time elapses, you cannot recover the deleted items.

You can view and recover deleted items, including the items that were deleted permanently, when you selected items and pressed SHIFT+ DELETE or SHIFT+.
  1. In the folder from where you deleted the item, or in the Deleted Items folder, click Recover Deleted Items on the Tools menu.


    Click Recover Deleted Items on the Tools menu.
  2. Click an item and then click Recover Selected Items .
To select multiple items, press CTRL as you click each item.
Each recovered item is restored to the folder from which it was deleted.

You cannot recover an item if it does not appear in the Recover Deleted Items dialog box.
.
.

Friday, September 19, 2008

What Happened to the Out of Office Warning in Outlook 2007?

The Out of Office message that warned us the Out of Office auto-replies was on in Outlook 2003, has moved and remains on the screen for only 15 seconds in Outlook 2007. In Outlook 2003, the warning appeared in the middle of the Outlook screen and stayed there until you dismissed it. It was kind of hard to miss, a very in-your-face reminder the Out of Office responder was on.


New location of Out of Office warning in Outlook 2007


Close-up of Out of Office warning

Now, in Outlook 2007, the reminder appears in the lower right corner of the Outlook window when you start it up and then disappears after 15 seconds. The same reminder appears when you first turn on the Out of Office Assistant. But this too disappears after 15 seconds. However, an Out of Office button remains in the right corner of the Task Bar.


Out of Office button on Task Bar

When the button is clicked, it will display a pop-up with two options. The first option, Out of Office Assistant... will pull up the Out of Office Assistant window. The second option, Turn off Out of Office auto-replies, does just that. When you turn off the Out of Office Assistant, the button disappears from the Task Bar.


Two options appear when Out of Office button is clicked

The Out of Office Assistant can also be turned off through the menu: Tools / Out of Office Assistant... select "I am currently In the Office" from the Out of Office Assistant window.


Tools menu in Outlook 2007


Select "I am currently In the Office" to turn off the Out of Office auto responder.

Monday, August 25, 2008

The 2007 Microsoft Office Button

The user interface has been significantly redesigned in the following 2007 Microsoft Office system programs: Word, Excel, PowerPoint, Access, and Outlook (in the composing and reading windows). Instead of menus and toolbars, the new interface uses a "ribbon" to organize commands.


Office Button in the Ribbon (Office Fluent User interface) in Word 2007

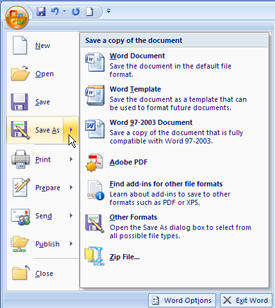
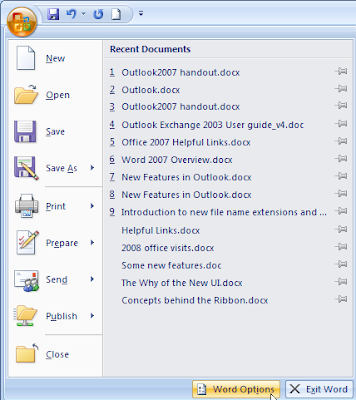
The Microsoft Office Button replaces the File menu and is located in the upper-left corner of the Ribbon in the Microsoft Office programs. This button provides access to functionality common to all Office applications.

When you click the Microsoft Office Button, you see the same basic commands available in earlier releases of Microsoft Office to open, save, and print your file. The commands available in the Office Button menu are: New, Open, Save, Save As, Print, Prepare, Send, Publish and Close.


The new commands, Prepare, Send and Publish give the user more options in finishing a document. Prepare will prepare the document for distribution, through such tasks as adding a signature or encryption. Send will send the document to another user by email or fax, and Publish makes the document publicly available via a document server or a public web space.

Commands are listed on the left, and on the right appear recently opened documents. If you can’t see a list of recently opened documents it could be that you have a menu selected on the left. If this is the case, just move the cursor away from that menu to deselect it.


The Tools menu/Options command moved to Word Options in Word 2007

In earlier versions of Microsoft Office, you could set your preferences for specific view, display, and editing settings in the Options dialog box (Tools menu, Options command). As part of the 2007 Office system, the Tools menu has been moved so that it is under Word Options, Excel Options, PowerPoint Options or Access Options in the lower corner of the Microsoft Office Button window.

As you open more documents, the list of recently opened documents grows; the more recent ones appear at the top. As you can imagine, the older ones will eventually disappear from this list. You can however ‘pin’ a document to the list so that it always appears there, no matter how big the list gets. Simply click the pushpin to the right of the document name and the file is pinned. To ‘unpin’ it, just click on the pushpin again.


'Unpinned' document in Recent Documents


Click on pushpin to 'pin' the document in Recent Documents

In Microsoft Office Outlook 2007 when you read or create a message, task, contact, or calendar item, you see the new Microsoft Office Button.