After composing images in PowerPoint you may want to export the slides as images for use in other documents like Microsoft Word or Acrobat.
Here's how to export PowerPoint slides as images:
1) Open the PowerPoint presentation that contains the slides you want to export as images
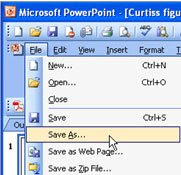
2) Select Save As... from the File menu in PowerPoint

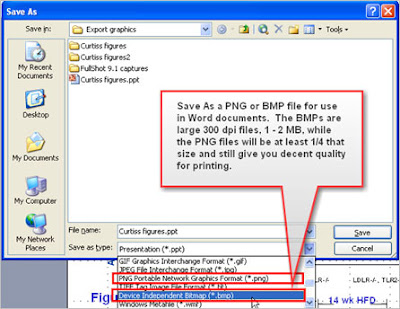
3) Use the Save as type: drop down menu to select either PNG or BMP files for documents that will eventually be printed. You can use the JPEG format for images that will be displayed on monitors, video projectors or for web use.

NOTE:
As noted in the above graphic, a PNG file will be about one fourth the size of a BMP file and will provide a print worthy resolution. So if you are concerned about the overall size of your document, a PNG file might be the way to go.
A BMP file usually is saved at 300 dpi (Dots Per Inch) by default and therefore is a high quality or high resolution graphic and will provide good print images.
When saving Word documents as PDF's, the amount and file size of the images in the Word document will affect the size of the PDF document.
4) After you select a file format, you will get a pop-up window that asks if you want Every Slide in the presentation or only the Current Slide to be exported as the file format you selected in the Save as type: drop-down menu in the Save As window.

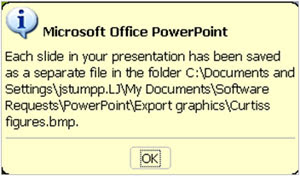
5) If you select Every Slide, all the slides in the presentation will be saved as the chosen file type and exported to a location whose path will be noted in the next window. (below) The default location is in the same folder as your presentation. PowerPoint will make a separate folder for the images when you select the Every Slide option. If you save the Current Slide Only, only that one slide will be saved in your folder that houses your presentation.

6) And finally, make sure you note where you saved your images if you change the default path.

No comments:
Post a Comment