This blog is based on an article by Susan Harkins, a writer for TechRepublic.
Printing a single envelope in Word is simple, but getting everything just right requires a bit of knowledge because there are many options.
The first step is to check your printer for envelope placement. If you’re lucky, you have a special drawer for envelopes. Lacking a drawer, you’ll probably find placement instructions on the manual feed. Check carefully; you should find a small embossed indicator that specifies the feed position for envelopes. They’re all different, so be sure to check your printer. For example, this Lexmark Z32 feeds an envelope face up and the bottom flush with the right side of the feed tray.

Once you have an envelope correctly positioned, you’re ready to enter the return and delivery addresses as follows:
- In Word 2007 and 2010 click Mailings on the Ribbon, then click Envelopes in the Create group. Or you can select Envelopes when creating a New document. These options are available in previous versions of Word, but the menus and dialogs are somewhat different.
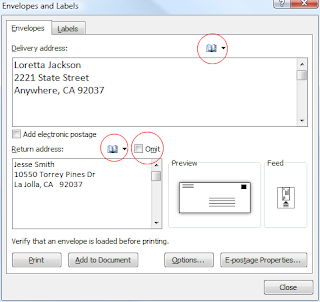
- On the Envelopes tab, enter the delivery and return address. (The return address may already be present, but you can change it.)
At this point, you have a few options you can apply:
- If Outlook is your default mail client, you can click the book icon to grab an existing address from Outlook to fill-in your delivery and/or return address.
- Check the Omit option if you do not want to print the return address.
- The Add Electronic Postage and E-Postage Property options are available, but work only if you have installed the appropriate software beforehand. We won’t cover those options today.
- Be sure to check the preview regularly, to make sure your choices match your needs.

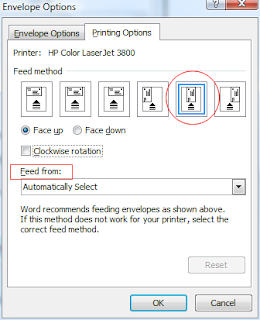
After entering your addresses, check the Feed option. This option confuses some users and you can’t depend on Word to configure things correctly. To get started, click the Feed option, select the Printing Options tab and set the following options, as required:
- First, choose Face Up or Face Down, accordingly. If the envelope goes through the manual feeder print side up, choose Face Up.
- If the Feed method options aren’t showing the print facing the right direction, click the Clockwise Rotation option.
- Use the Feed From dropdown if you have a special envelop drawer or feed.

Once you’ve set the Feed options correctly, click OK to return to the first dialog box. Check the Feed option; the picture should update according to your choices.
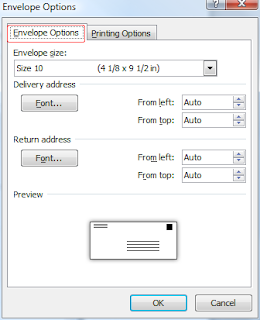
You might want to change the font and address positions on the envelope. To do so, click the Options button and select the Envelope Options tab. You can change the envelope size by choosing an option from the Envelope Size dropdown.
Changing the font is easy; while on the Envelope Options tab, click the appropriate Font button and change the options as you normally would. To reset the position of the return or delivery address use the From Left and From Top options and watch the preview envelope update accordingly.
Changing the font is easy; while on the Envelope Options tab, click the appropriate Font button and change the options as you normally would. To reset the position of the return or delivery address use the From Left and From Top options and watch the preview envelope update accordingly.

When you’re done, click OK to return to the original dialog. At this point, you’re ready to print, click Print and you’re done!

1 comment:
Post a Comment