Friday, June 27, 2008

Lines Under Text Field Forms in Word 2003

I've received many requests for assistance on Microsoft Word forms. By the way, I recommend using Acrobat 8.0 Professional for forms, but for those of you using Word - this week's tip is for you. You will learn how to create a text field form in Word with a line under it.

If you want to skip the following instructions and just watch the tutorial as a flash movie, go to:
http://www.scripps.edu/hr/training/forms_lines.html
.
My sample document is a partially completed Word 2003 document with some form fields pictured below.

Unfinished Word form

We are going to add a text field form with a line under it by Email Address.
  • Click View in the Menu
  • Click Toolbars
  • Click Forms on the drop-down menu from Toolbars
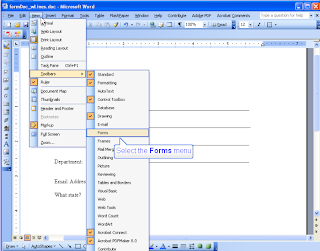
  • The Forms toolbar appears
  • Place your cursor where you want your form field and click once.
  • Then go up to the Forms toolbar and click the Text Form Field button (first button [ab] in the Forms toolbar).
  • A text form field appears shaded in – you can clear the grey color by clicking on the orange button with an “a” on it on the Forms toolbar.
  • Click the Frame button on the Forms toolbar.
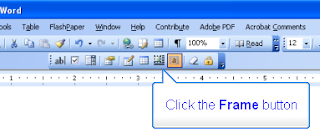
  • The text form field is now enclosed in a frame and might have jumped to a different location on your document
  • Drag it back into place
  • Size it by clicking and dragging the border handles that appear as small squares around the frame
  • After it is the size you want, right click the frame
    .

.
  • Select Borders and Shading… from the drop-down menu
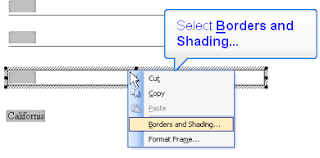

.
  • The Borders tab should be open by default when the Borders and Shading dialog window opens
  • Click the Top Border button in the Preview section (on the right) in the Borders tab to get rid of it. Next Click the Left and Right Border buttons to get rid of that part of the border.
    .
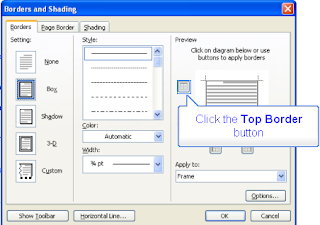
  • Now the Preview window should display the bottom of the frame only.
  • Click OK to close the Borders and Shading window.
  • The remaining frame line will be the line under the text field form.
  • Click away from the frame to deselect it.
    .
    .
    .
  • The text field form now has a line under it that will stay with the form.
    .
  • Finally to activate the form fields you need to protect the document: by selecting Tools on the menu, then Protect Document. In the Protect Document task pane under 2. Editing Restrictions, check “Allow only this type of editing in the document;” and select Filling in forms from the drop-down. Then click the “Yes, Start Enforcing Protection” button and choose a password if you want one. If you don’t want a password, just click OK.
    .
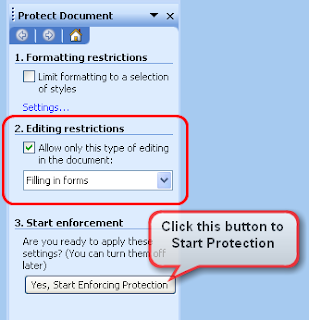
Protect Document Task Pane that will pop up on the right side of your document.


Of course there are other settings from which to choose in the Protect Document task pane but your form could be ready to distribute as is.

A good review of this tutorial is to watch the movie if you haven't already:
http://www.scripps.edu/hr/training/forms_lines.html

Friday, June 20, 2008

Creating PDFs from Web Pages in Acrobat 8.0

Did you know that Acrobat can convert a whole website into a PDF? This is a very nifty feature of Acrobat 8.0.

You may have known that you can easily download a page from a
Web site using the PDFMaker that installs in Internet Explorer, but you can also download a website or part of a website from within Acrobat and control its content and how it is displayed in the resulting PDF file (links and all).


PDFMaker in Internet Explorer

Here's how you do it:

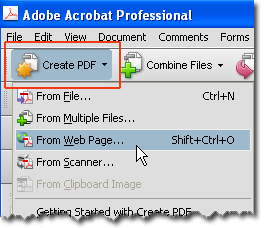
Click the Create PDF task button and click From Web Page..., or choose File > Create PDF > From Web Page to open the Create PDF from Web Page dialog.

Create PDF task button

Specify the web page location (URL) and define the settings for converting a Web page to PDF in the Create PDF from Web Page dialog box (below).


Create PDF from Web Page dialog box

Access the file you want to convert in one of three ways, depending on the location and type of file. You can type the URL for the file if it’s on the Internet, click the arrow to the right of the right of the URL field to work with Web files that have been opened previously in Acrobat, or click Browse to open the Select File to Open dialog to locate a file that’s on a local disk.

Under Settings in the Create PDF from Web Page dialog box:

  • Enter the number of levels you want to include, or select Get Entire Site to include all levels form the website.
  • Stay On Same Path - Downloads only web pages subordinate to the specified URL.
  • Stay on Same Server - Downloads only web pages stored on the same server.

Click Create to start the conversion process. The Download Status dialog shows you the number of connections active in the downloaded material, as well as the names, sizes, and locations of the files. When the download is complete, Acrobat displays the new PDF file in the Document pane and adds a document structure to the Bookmarks tab. Choose File > Save to save the converted Web pages.


PDF file in the Document pane and document structure in the Bookmarks tab

As you scroll through the document, notice that both a header and footer are added to the page. The header is the Web page’s name; the footer contains the URL for the page, the number of pages, and the download date and time.


Headers and footers are added in the PDF for each web page


Tuesday, June 10, 2008

Creating Forms Automatically in Acrobat 8

One of the coolest new features in Acrobat 8 Professional is the ablility to create a form from a document using artificial intelligence to trcognize fields automatically. Here's how it works:

1) Open the document in Acrobat 8 Professional – the form can be a PDF version of a document created in Word, InDesign, Excel, Photoshop, or even an a scanned paper document.

2) Choose Forms > Run Form Field Recognition. Acrobat processes the document and displays several features in the program window:


  • The Document Message Bar, which shows the basic form information; click Highlight Fields to toggle the field background color on or off.


Highlight Fields icon

  • The new fields added to the form are highlighted.
  • The Detect Form Fields Report lists the identified fields; repair hints open in the Recognition Report panel.


Recognition Report

  • The report can be toggled open and closed by clicking the Recognition Report panel’s icon. The panel displays in the Navigation pane automatically.

3) Choose View > Navigation Panels > Fields to open the Fields panel (Figure below). The fields detected on the form are listed in alphabetical order.


To open the Fields panel

4) The panel may be docked in the Navigation pane, or tabbed with other panels. To read both the Recognition Report and the Fields panel, drag the Field panel icon (Figure below) right to detach it from the Navigation pane.


Fields panel

5) Start making corrections in the form. In the sample form, section headings are defined as Text Box fields, for example, instead of being static text. You can:

  • Select a field and delete it.

  • Double-click a field in the panel to open its Properties dialog and customize the settings.

  • Add fields as required for your project.

  • Choose “Edit form in Acrobat” from the Options menu in the Fields panel to activate the Forms toolbar and the fields on the form.

To change the tabbing order, save and close the form. Then open the form in Adobe LiveCycle Designer and revise the tabbing order.

The Form Field Recognition feature is the most helpful when used on basic forms created in Word. It can be a real time saver when used with simple forms.

However if you have a lot of graphics or a complex layout, you might want to save the original document as a PDF and then open it in Adobe LiveCycle Designer (comes bundled with Acrobat Professional 8.0) to create the interactive form elements.