
The traditional way of making selections in Photoshop involved using a tool such as the Magnetic Lasso to trace the perimeter of the area that you intended to select. Then Adobe introduced the Magic Wand tool, which allows you to make selections by clicking on specific areas within an image that you’d like to select—the Magic Wand then makes an educated guess at the selection based on pixel color. Photoshop CS3’s new Quick Selection tool is the next step in Photoshop selections—it makes the entire process of selecting specific parts of an image easier, faster, and more accurate.
Advantages of the Quick Selection Tool
Though you can still use the Magnetic Lasso and /or the Magic Wand to make selections in Photoshop CS3, you’ll probably want to use the Quick Selection tool instead, since it offers so many advantages over its predecessors:
- Ease: The Quick Selection tool does most of the work of making a selection for you. You don’t need to trace the area manually, as you do with the Magnetic Lasso, or click once and hope that the tool guesses the selection that you’d like to make, as you do with the Magic Wand. Instead you simply paint within the area that you’d like to select.
- Accuracy: The Quick Selection tool guesses the areas that you intend to select much more accurately than the Magic Wand tool does. The tool’s accuracy makes the process of making even complicated selections much more efficient.
- Convenience: With other selection tools, after you’ve made your selection, you need to use other features to fine-tune it. If you then decide to change the selection, you need to step back through your History to redo the selection. The Quick Selection lets you fine-tune your selection from within the tool itself, before finalizing the selection.
- Preview: Photoshop users typically make selections with the intention of using the selected pixels in another image (or layer), as a Quick Mask, or as a Layer Mask. The Quick Selection tool facilitates this process by letting you preview how your selection will appear against various colored backgrounds, as a Quick Mask, or as a Layer Mask before you actually make the selection.
How to Access the Quick Selection Tool
The Quick Selection tool is located in Photoshop’s Tools palette, in the same button that houses the Magic Wand tool.
- Click on the Magic Wand tool’s icon
 in the Tools palette and move your cursor to the right.
- A submenu will appear to the right in which you can select the Quick Selection tool.

The Quick Selection Toolbar
When you select the Quick Selection tool in the Photoshop Tools palette, the Quick Selection toolbar will appear just under the main Photoshop toolbar at the top of your screen. The Quick Selection toolbar contains several options and features unique to the Quick Selection tool.
1. Select the Quick Selection tool.
2. Specify one of the selection options in the options bar: New, Add to, Subtract from. New is the default option if nothing is selected. After making the initial selection, the option changes automatically to Add to.
3. To change the Quick Selection tool brush tip size, click the Brush menu in the options bar and type in a pixel size or move the Diameter slider. Use the Size pop-up menu options to make the brush tip size sensitive to pen pressure or a stylus wheel.
When creating a selection, press the right bracket (]) to increase the Quick Selection tool brush tip size; press the left bracket ([) to decrease the brush tip size.
4. Choose Quick Selection options
Sample All Layers Creates a selection based on all layers instead of just the currently selected layer. Auto-Enhance reduces roughness and blockiness in the selection boundary. Auto-Enhance automatically flows the selection further towards image edges and applies some of the edge refinement you can apply manually set in the Refine Edge dialog box with the Smooth, Contrast and Radius options.
5. Paint inside the part of the image you want to select. The selection grows as you paint. As you paint near the edges of a shape, the selection area extends to follow the contours of the shape edge.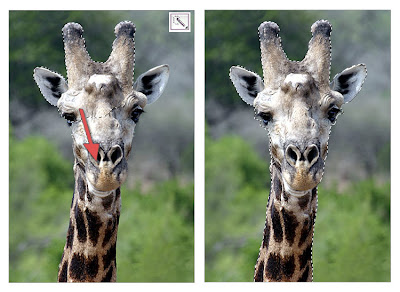 Painting with the Quick Selection tool to extend the selection.
If you stop dragging and then click or drag in a nearby area, the selection will grow to include the new area.
- To subtract from a selection, click the Subtract from option in the options bar, then drag over the existing selection.
- To temporarily switch between add and subtract modes, hold down the Alt (Windows) or Option (Mac) key.
- To change the tool cursor, choose Edit > Preferences > Cursors > Painting Cursors (Windows) or Photoshop > Preferences > Cursors > Painting Cursors (Mac OS). Normal Brush Tip displays the standard Quick Selection cursor with a plus or minus sign to show the selection mode.
6. (Optional) Click Refine Edge to further adjust the selection boundary of view the selection against different backgrounds or as a mask.


