Tuesday, September 30, 2008

Recover Deleted Items in Outlook 2007

Did you know that you can recover deleted items in Microsoft Office Outlook 2007 even after you have emptied the Deleted Items folder. In past versions of Outlook, once the Deleted Items folder was emptied, those items were permanently deleted.

But now you can recover these deleted items if you have a Microsoft Exchange Server account. If you don't have an Exchange Server account here at Scripps Research, it's easy to get one. Just submit a service request to IT Services at http://www.scripps.edu/rc/hd/ or call the Help Desk x4-9369 and ask for one.

Our Exchange Server administrator specifies the retention time for items that are deleted permanently on the server running Exchange. Our retention time is 30 days. After this time elapses, you cannot recover the deleted items.

You can view and recover deleted items, including the items that were deleted permanently, when you selected items and pressed SHIFT+ DELETE or SHIFT+.
  1. In the folder from where you deleted the item, or in the Deleted Items folder, click Recover Deleted Items on the Tools menu.


    Click Recover Deleted Items on the Tools menu.
  2. Click an item and then click Recover Selected Items .
To select multiple items, press CTRL as you click each item.
Each recovered item is restored to the folder from which it was deleted.

You cannot recover an item if it does not appear in the Recover Deleted Items dialog box.
.
.

Friday, September 19, 2008

What Happened to the Out of Office Warning in Outlook 2007?

The Out of Office message that warned us the Out of Office auto-replies was on in Outlook 2003, has moved and remains on the screen for only 15 seconds in Outlook 2007. In Outlook 2003, the warning appeared in the middle of the Outlook screen and stayed there until you dismissed it. It was kind of hard to miss, a very in-your-face reminder the Out of Office responder was on.


New location of Out of Office warning in Outlook 2007


Close-up of Out of Office warning

Now, in Outlook 2007, the reminder appears in the lower right corner of the Outlook window when you start it up and then disappears after 15 seconds. The same reminder appears when you first turn on the Out of Office Assistant. But this too disappears after 15 seconds. However, an Out of Office button remains in the right corner of the Task Bar.


Out of Office button on Task Bar

When the button is clicked, it will display a pop-up with two options. The first option, Out of Office Assistant... will pull up the Out of Office Assistant window. The second option, Turn off Out of Office auto-replies, does just that. When you turn off the Out of Office Assistant, the button disappears from the Task Bar.


Two options appear when Out of Office button is clicked

The Out of Office Assistant can also be turned off through the menu: Tools / Out of Office Assistant... select "I am currently In the Office" from the Out of Office Assistant window.


Tools menu in Outlook 2007


Select "I am currently In the Office" to turn off the Out of Office auto responder.

Monday, August 25, 2008

The 2007 Microsoft Office Button

The user interface has been significantly redesigned in the following 2007 Microsoft Office system programs: Word, Excel, PowerPoint, Access, and Outlook (in the composing and reading windows). Instead of menus and toolbars, the new interface uses a "ribbon" to organize commands.


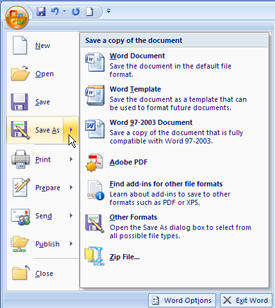
Office Button in the Ribbon (Office Fluent User interface) in Word 2007

The Microsoft Office Button replaces the File menu and is located in the upper-left corner of the Ribbon in the Microsoft Office programs. This button provides access to functionality common to all Office applications.

When you click the Microsoft Office Button, you see the same basic commands available in earlier releases of Microsoft Office to open, save, and print your file. The commands available in the Office Button menu are: New, Open, Save, Save As, Print, Prepare, Send, Publish and Close.


The new commands, Prepare, Send and Publish give the user more options in finishing a document. Prepare will prepare the document for distribution, through such tasks as adding a signature or encryption. Send will send the document to another user by email or fax, and Publish makes the document publicly available via a document server or a public web space.

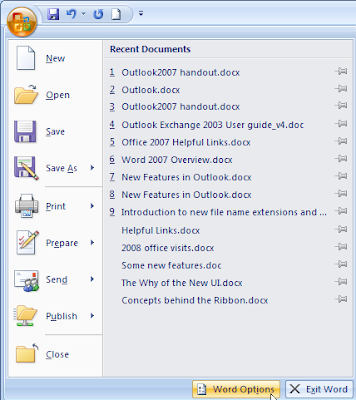
Commands are listed on the left, and on the right appear recently opened documents. If you can’t see a list of recently opened documents it could be that you have a menu selected on the left. If this is the case, just move the cursor away from that menu to deselect it.


The Tools menu/Options command moved to Word Options in Word 2007

In earlier versions of Microsoft Office, you could set your preferences for specific view, display, and editing settings in the Options dialog box (Tools menu, Options command). As part of the 2007 Office system, the Tools menu has been moved so that it is under Word Options, Excel Options, PowerPoint Options or Access Options in the lower corner of the Microsoft Office Button window.

As you open more documents, the list of recently opened documents grows; the more recent ones appear at the top. As you can imagine, the older ones will eventually disappear from this list. You can however ‘pin’ a document to the list so that it always appears there, no matter how big the list gets. Simply click the pushpin to the right of the document name and the file is pinned. To ‘unpin’ it, just click on the pushpin again.


'Unpinned' document in Recent Documents


Click on pushpin to 'pin' the document in Recent Documents

In Microsoft Office Outlook 2007 when you read or create a message, task, contact, or calendar item, you see the new Microsoft Office Button.

Friday, August 1, 2008

Outlook - Got Connection?

I have several mailboxes in my Outlook (on Exchange) other than my own email mailbox and suddenly was unable to open them. I got this error: “The set of folders could not be opened.” I thought I was online because I could receive and send email. But no, Outlook was offline and I didn't see it because Clippit was covering up the connection status! Outlook would connect only to upload and download email and then it would go offline.


Connection indicator located in right hand corner displaying Offline status.


Clippit on top of the Connection indicator.

Okay, I admit I should have given Clippit the boot a long time ago. And yes I know Clippit was detested among most users as intrusive and annoying. I cannot remember when I activated Clippit but I do know I never got irritated enough to turn it off...until now.

How did Outlook become offline if I did not change its setting? I was told that if there is a long enough disruption in the connection to the Exchange server, Outlook could switch to an offline status and remain like that until you reconnect using the connection button in the lower right corner, or by selecting File / Work Offline. We had a couple of email disruptions the past couple of weeks which might have triggered the Outlook to disconnect from Exchange.


Click Work Offline to change connection
status and work online.

So when I clicked the Work Offline command, the check mark disappeared (which means it was deselected) and Outlook quickly connected to the Exchange server. My other mailboxes were accessible, and all was well again.


Connection indicator displaying online status.


Friday, July 25, 2008

Flag Email for Follow-up in Outlook

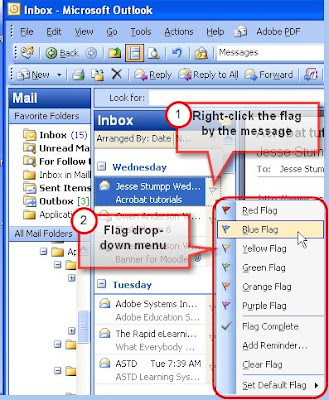
Assign flags to your email messages in Outlook to remind yourself to follow up on an issue. You can also use flags to categorize messages in your inbox. There are six colors - red, blue, yellow, green, orange, and purple - that can be used to mean different things. Message flags are displayed in the last column of the Inbox view.


Flag icons are displayed on the right side of each message.
The flag drop-down menu appears when icon is right-clicked.


You can use message flags to do the following:

  • To flag a message with a particular color, right-click the flag that corresponds to the message and then select the flag color.
  • To flag a message as complete, right-click the message, and then click Flag Complete.
  • To sort your messages by color, click the flag column heading.
  • To clear a flag from a message, right-click the mesage, and then click Clear Flag.

Tuesday, July 8, 2008

Switch Excel Columns to Rows

Have you ever wanted to change a column of data into a row in Excel?
Here's how you do it:

1. Open the spreadsheet you need to change.
2. Click the first cell of your data range such as D1 (Third Quarter in figure 1).
3. Shift-click the last cell of the range. Your selection should highlight.
4. Right click and select Copy from the right-click context menu (figure 1). Or go to the Edit menu and select Copy.


figure 1

5. Click on the Cell you want to paste the range of data. We will use A7.
6. Right click cell A7. From the Right-click context menu, select Paste Special... (figure 2).


figure 2

7. The Paste Special dialog should appear (figure 3).
8. Click the checkbox for Transpose.


figure 3

9. ..Click OK.
10. Your data from D1:D5 is now displayed in Row(A7:E7) (figure 4).


figure 4

You can go from columns to rows, or rows to columns using the same procedure.
.

Friday, June 27, 2008

Lines Under Text Field Forms in Word 2003

I've received many requests for assistance on Microsoft Word forms. By the way, I recommend using Acrobat 8.0 Professional for forms, but for those of you using Word - this week's tip is for you. You will learn how to create a text field form in Word with a line under it.

If you want to skip the following instructions and just watch the tutorial as a flash movie, go to:
http://www.scripps.edu/hr/training/forms_lines.html
.
My sample document is a partially completed Word 2003 document with some form fields pictured below.

Unfinished Word form

We are going to add a text field form with a line under it by Email Address.
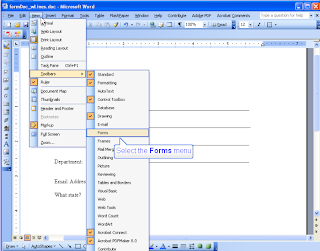
  • Click View in the Menu
  • Click Toolbars
  • Click Forms on the drop-down menu from Toolbars
  • The Forms toolbar appears
  • Place your cursor where you want your form field and click once.
  • Then go up to the Forms toolbar and click the Text Form Field button (first button [ab] in the Forms toolbar).
  • A text form field appears shaded in – you can clear the grey color by clicking on the orange button with an “a” on it on the Forms toolbar.
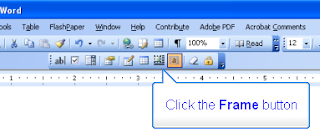
  • Click the Frame button on the Forms toolbar.
  • The text form field is now enclosed in a frame and might have jumped to a different location on your document
  • Drag it back into place
  • Size it by clicking and dragging the border handles that appear as small squares around the frame
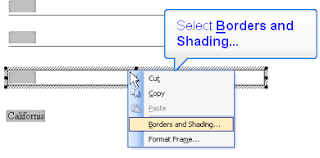
  • After it is the size you want, right click the frame
    .

.
  • Select Borders and Shading… from the drop-down menu


.
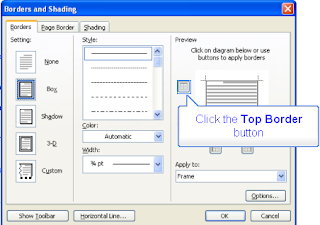
  • The Borders tab should be open by default when the Borders and Shading dialog window opens
  • Click the Top Border button in the Preview section (on the right) in the Borders tab to get rid of it. Next Click the Left and Right Border buttons to get rid of that part of the border.
    .
  • Now the Preview window should display the bottom of the frame only.
  • Click OK to close the Borders and Shading window.
  • The remaining frame line will be the line under the text field form.
  • Click away from the frame to deselect it.
    .
    .
    .
  • The text field form now has a line under it that will stay with the form.
    .
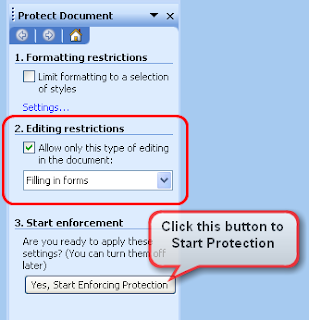
  • Finally to activate the form fields you need to protect the document: by selecting Tools on the menu, then Protect Document. In the Protect Document task pane under 2. Editing Restrictions, check “Allow only this type of editing in the document;” and select Filling in forms from the drop-down. Then click the “Yes, Start Enforcing Protection” button and choose a password if you want one. If you don’t want a password, just click OK.
    .

Protect Document Task Pane that will pop up on the right side of your document.


Of course there are other settings from which to choose in the Protect Document task pane but your form could be ready to distribute as is.

A good review of this tutorial is to watch the movie if you haven't already:
http://www.scripps.edu/hr/training/forms_lines.html

Friday, June 20, 2008

Creating PDFs from Web Pages in Acrobat 8.0

Did you know that Acrobat can convert a whole website into a PDF? This is a very nifty feature of Acrobat 8.0.

You may have known that you can easily download a page from a
Web site using the PDFMaker that installs in Internet Explorer, but you can also download a website or part of a website from within Acrobat and control its content and how it is displayed in the resulting PDF file (links and all).


PDFMaker in Internet Explorer

Here's how you do it:

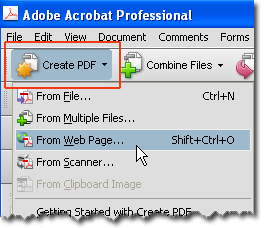
Click the Create PDF task button and click From Web Page..., or choose File > Create PDF > From Web Page to open the Create PDF from Web Page dialog.

Create PDF task button

Specify the web page location (URL) and define the settings for converting a Web page to PDF in the Create PDF from Web Page dialog box (below).


Create PDF from Web Page dialog box

Access the file you want to convert in one of three ways, depending on the location and type of file. You can type the URL for the file if it’s on the Internet, click the arrow to the right of the right of the URL field to work with Web files that have been opened previously in Acrobat, or click Browse to open the Select File to Open dialog to locate a file that’s on a local disk.

Under Settings in the Create PDF from Web Page dialog box:

  • Enter the number of levels you want to include, or select Get Entire Site to include all levels form the website.
  • Stay On Same Path - Downloads only web pages subordinate to the specified URL.
  • Stay on Same Server - Downloads only web pages stored on the same server.

Click Create to start the conversion process. The Download Status dialog shows you the number of connections active in the downloaded material, as well as the names, sizes, and locations of the files. When the download is complete, Acrobat displays the new PDF file in the Document pane and adds a document structure to the Bookmarks tab. Choose File > Save to save the converted Web pages.


PDF file in the Document pane and document structure in the Bookmarks tab

As you scroll through the document, notice that both a header and footer are added to the page. The header is the Web page’s name; the footer contains the URL for the page, the number of pages, and the download date and time.


Headers and footers are added in the PDF for each web page


Tuesday, June 10, 2008

Creating Forms Automatically in Acrobat 8

One of the coolest new features in Acrobat 8 Professional is the ablility to create a form from a document using artificial intelligence to trcognize fields automatically. Here's how it works:

1) Open the document in Acrobat 8 Professional – the form can be a PDF version of a document created in Word, InDesign, Excel, Photoshop, or even an a scanned paper document.

2) Choose Forms > Run Form Field Recognition. Acrobat processes the document and displays several features in the program window:


  • The Document Message Bar, which shows the basic form information; click Highlight Fields to toggle the field background color on or off.


Highlight Fields icon

  • The new fields added to the form are highlighted.
  • The Detect Form Fields Report lists the identified fields; repair hints open in the Recognition Report panel.


Recognition Report

  • The report can be toggled open and closed by clicking the Recognition Report panel’s icon. The panel displays in the Navigation pane automatically.

3) Choose View > Navigation Panels > Fields to open the Fields panel (Figure below). The fields detected on the form are listed in alphabetical order.


To open the Fields panel

4) The panel may be docked in the Navigation pane, or tabbed with other panels. To read both the Recognition Report and the Fields panel, drag the Field panel icon (Figure below) right to detach it from the Navigation pane.


Fields panel

5) Start making corrections in the form. In the sample form, section headings are defined as Text Box fields, for example, instead of being static text. You can:

  • Select a field and delete it.

  • Double-click a field in the panel to open its Properties dialog and customize the settings.

  • Add fields as required for your project.

  • Choose “Edit form in Acrobat” from the Options menu in the Fields panel to activate the Forms toolbar and the fields on the form.

To change the tabbing order, save and close the form. Then open the form in Adobe LiveCycle Designer and revise the tabbing order.

The Form Field Recognition feature is the most helpful when used on basic forms created in Word. It can be a real time saver when used with simple forms.

However if you have a lot of graphics or a complex layout, you might want to save the original document as a PDF and then open it in Adobe LiveCycle Designer (comes bundled with Acrobat Professional 8.0) to create the interactive form elements.

Thursday, May 29, 2008

Save PowerPoint Slides as Images

Many people use PowerPoint to compose images because they are familiar with PowerPoint and due to time constraints, find it's more efficient to use instead of imaging software such as Photoshop.

After composing images in PowerPoint you may want to export the slides as images for use in other documents like Microsoft Word or Acrobat.

Here's how to export PowerPoint slides as images:

1) Open the PowerPoint presentation that contains the slides you want to export as images

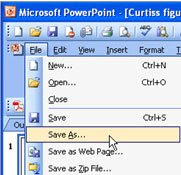
2) Select Save As... from the File menu in PowerPoint


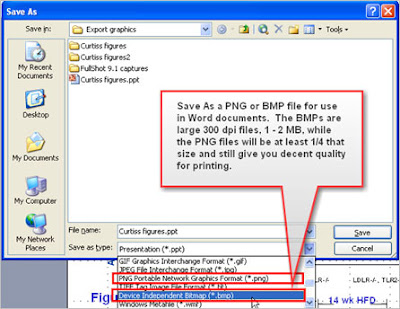
3) Use the Save as type: drop down menu to select either PNG or BMP files for documents that will eventually be printed. You can use the JPEG format for images that will be displayed on monitors, video projectors or for web use.

NOTE:
As noted in the above graphic, a PNG file will be about one fourth the size of a BMP file and will provide a print worthy resolution. So if you are concerned about the overall size of your document, a PNG file might be the way to go.

A BMP file usually is saved at 300 dpi (Dots Per Inch) by default and therefore is a high quality or high resolution graphic and will provide good print images.

When saving Word documents as PDF's, the amount and file size of the images in the Word document will affect the size of the PDF document.

4) After you select a file format, you will get a pop-up window that asks if you want Every Slide in the presentation or only the Current Slide to be exported as the file format you selected in the Save as type: drop-down menu in the Save As window.


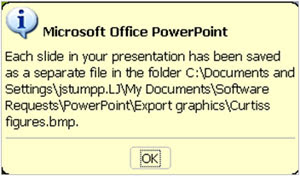
5) If you select Every Slide, all the slides in the presentation will be saved as the chosen file type and exported to a location whose path will be noted in the next window. (below) The default location is in the same folder as your presentation. PowerPoint will make a separate folder for the images when you select the Every Slide option. If you save the Current Slide Only, only that one slide will be saved in your folder that houses your presentation.


6) And finally, make sure you note where you saved your images if you change the default path.

Tuesday, May 20, 2008

How to Change Case in Microsoft Word (e.g. UPPERCASE to lowercase)

Have you ever been typing away in Microsoft Word only to notice, when you took a breather, that all the text was capitalized because you inadvertently hit the Caps Lock key?

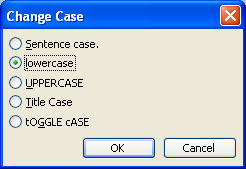
Well no problem, this can be quickly remedied. Just select the text and go to Format on the menu, select Change Case... and click on lowercase. This works on both Macs and PCs.

Here's an illustrated overview of that process:

1. Select the text.

2. Go to Format on the menu

3. Select Change Case...

4. Select lowercase in the Change Case window


Your text is now converted to all lower case.

There are five options in the Change Case window: Sentence case, lowercase, UPPERCASE, Title Case and tOGGLE cASE.

Examples of the five options:

  • Sentence:.............

  • lowercase:.............

  • UPPERCASE:......

  • Title Case:............

  • tOGGLE cASE:....